
Get Started with Jade Wallet
If you are new to Jade Wallet or unfamiliar with it, please read this article to learn more about how to use it.
Register and Login
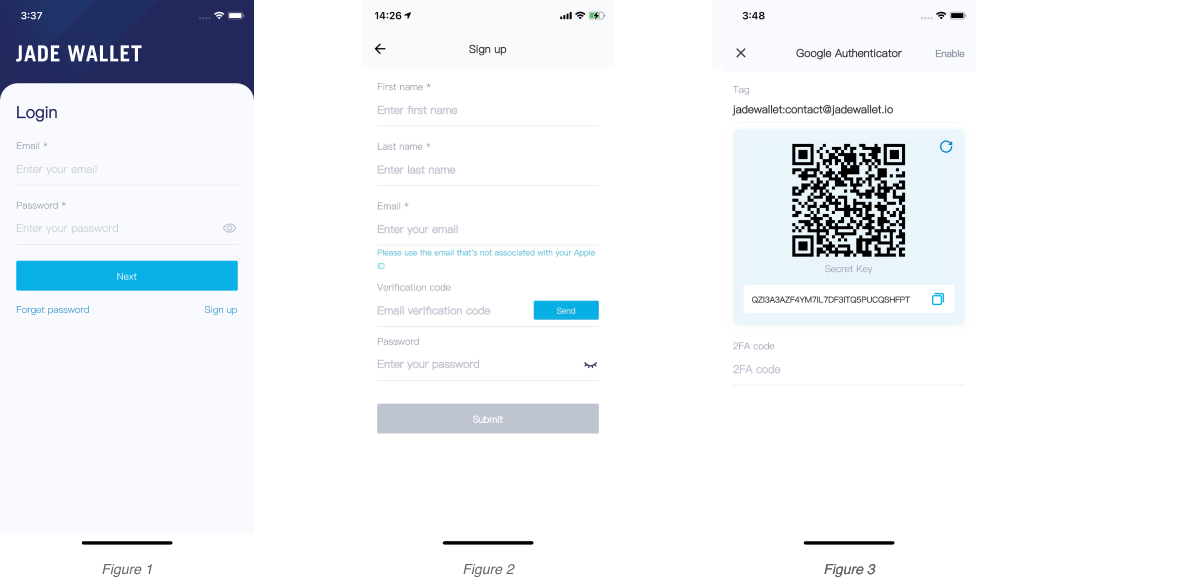
When you start using Jade Wallet for the first time, you will see the login page (Figure 1). If you haven't registered before, please click "Sign up" to fill out the registration information (Figure 2). You need fill the verification code sent to your email to verify and activate account.
After activating your account successfully, please enter your email address and the password you just set to log in your account. When you login successfully, Google Authenticator is needed to set up to ensure the security of your account (Figure 3).
Create A Wallet
If you have never created a wallet before, you can click the "Add Wallet" button or the "+" button in the upper right corner to start creating a wallet; if you have already had one, you can click the "+" button to create another. (Figure 4)
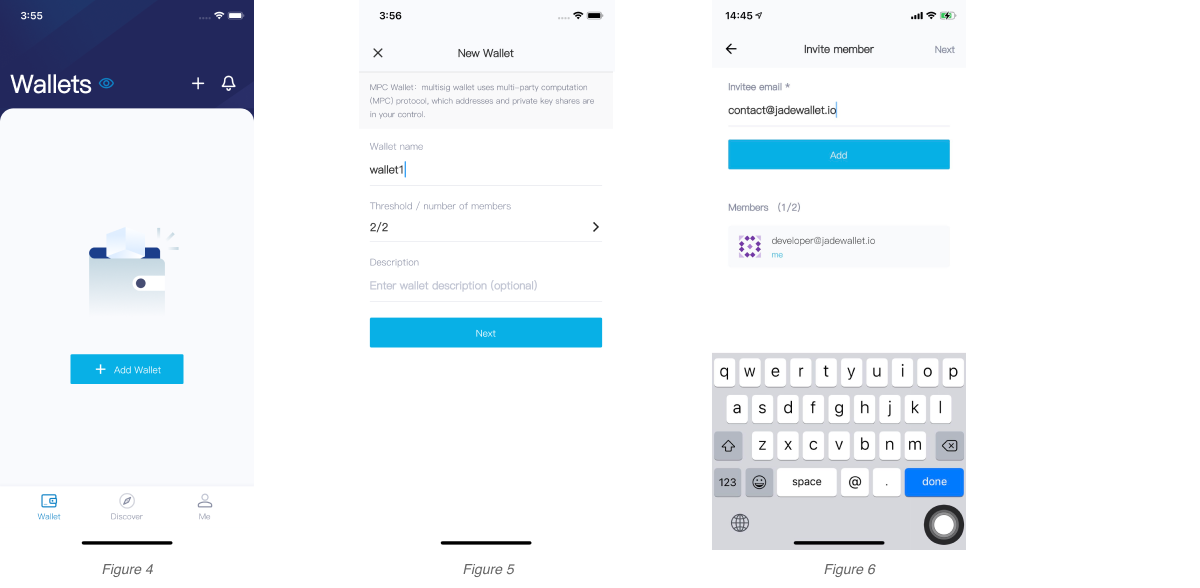
On “New Wallet" page (Figure 5), you should enter the wallet name, select the threshold and the number of members (currently 2/2, 2/3, 3/5). Jade Wallet uses multi-party computation technology to do threshold signature. The threshold is the number of members required to participate in multi-party calculations when signing transactionsq. After confirming that the information is correct, click "Next". Then you need to invite members to the wallet (Figure 6). After filling the email address of some member, click "Add" to invite him/her.
Click "Next" after members added. Then you should confirm the threshold, number of members and member information again, then check "Accept Terms of Service" and click "Activate" (Figure 7).

Jade Wallet uses Face ID to encrypt confidential information such as secret keyshare. Please make sure your iPhone is Face ID enabled (Figure 8). Jade Wallet also uses iCloud Drive to backup your share recovery data, please make sure iCloud Drive is enabled and has permission to access network (Figure 9). For the relative principle, you may check this link: https://www.jadewallet.io/icloud-based-backup-restore-solution.html for the principle.
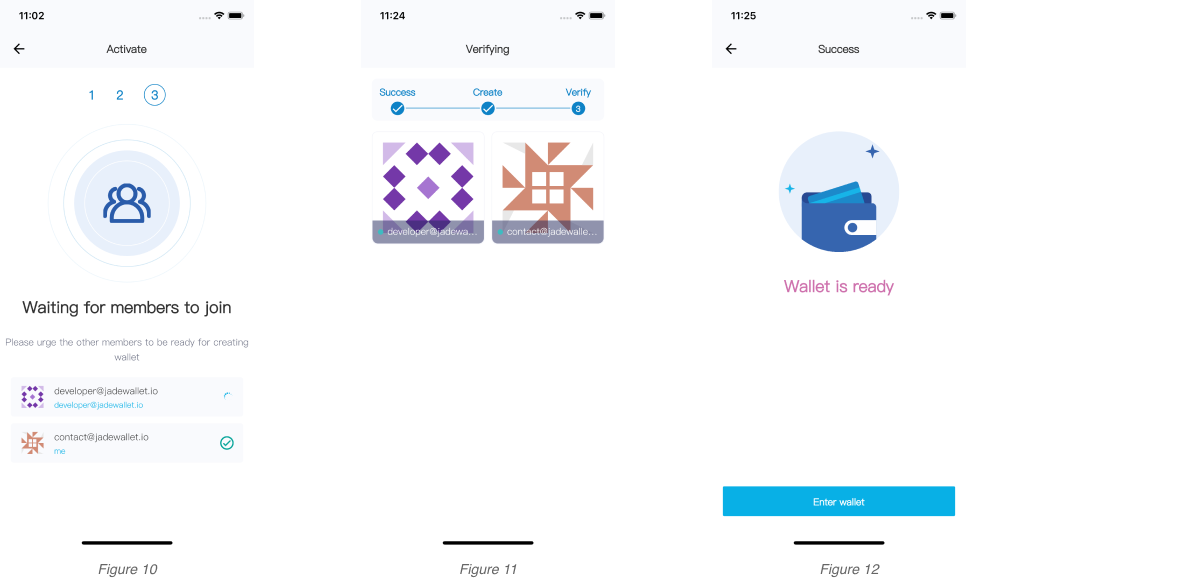
The last step to do before creating a wallet is to wait for other members to be ready (Figure 10). For the members who is ready, you will see the “ ✓ “ button on the right side of his account . After all members get in, it is time to start creating the wallet (Figure 11). Please pay attention to the prompt on the app when creating the wallet because Face ID verification is required. You will also see the message on the app to tell you that the wallet is successfully created (Figure 12).
Send a Transaction
For the detailed process of sending a transaction, please see the tutorial video below 👇. The instructions of creating a wallet is also included in it.
WalletConnect & DeFi
With Jade Wallet, integrating with WalletConnect, you can connect with desktop DApps easily, including but not limited to Uniswap, Aave, SushiSwap, etc.
For more, please check the video below 👇
Take the use of “Swap” as an example:
Alice clicks "Connect to a wallet" on Uniswap, and selects "WalletConnect" from the connection options that pop up. Then a QR code will be shown on the web page.
Alice goes to the "Discover" page on Jade Wallet and clicks "WalletConnect" to scan the code. The Uniswap’s connection request will appear on Jade Wallet in a while. After successful authorization, the wallet address and ETH balance will be displayed on Uniswap.
Alice swaps ETH to DAI on Uniswap. Click "Swap" and Uniswap will send the transaction data to Jade Wallet, then a page with transaction information will pop up on Jade Wallet. Alice sees the parsed data and clicks "Confirm" to submit the transaction order. Alice enters the signature transaction process and waits for the other members to be ready to sign. For a wallet with the rule of 2-3 signature, another member needs to be involved in the signing process.
Alice notifies another member Bob. Bob opens the Jade Wallet on his phone, accesses the corresponding ETH wallet and views the transaction order previously submitted by Alice. On the transaction details page, Bob clicks the "Agree" button to enter the signature transaction process, at which point both Alice and Bob's phones will indicate that the member is ready.
Alice and Bob each need to reconfirm the detail of the transaction (what you see is what you sign), and click the "Confirm" button after confirming that the transaction detail is correct. Jade Wallet uses Face ID to verify the user and read the encrypted stored private keyshare. The transaction is signed using Alice's and Bob's private keyshares through MPC. After the signed transaction is successfully broadcast, the status of the transaction is displayed on Uniswap.